AR Photobooth with Intuiface - inspired by "Dallas Cowboys' Pose With The Pros"

Since the Dallas Cowboys released their “Pose with the Pros” photobooth video, the topic went “viral” among the signage creatives that we are. We actually got dozens of requests about how to create such an experience within Intuiface.

While Intuiface doesn’t have a built-in “AR photobooth” feature, the good news is that the versatility of Intuiface makes almost anything possible with a bit of reverse engineering of the intent and… creativity :slight_smile:

For our impatient readers, jump to the 3rd part in this post.

1st part: Understand what’s going on in the existing video

Here is what’s going on:

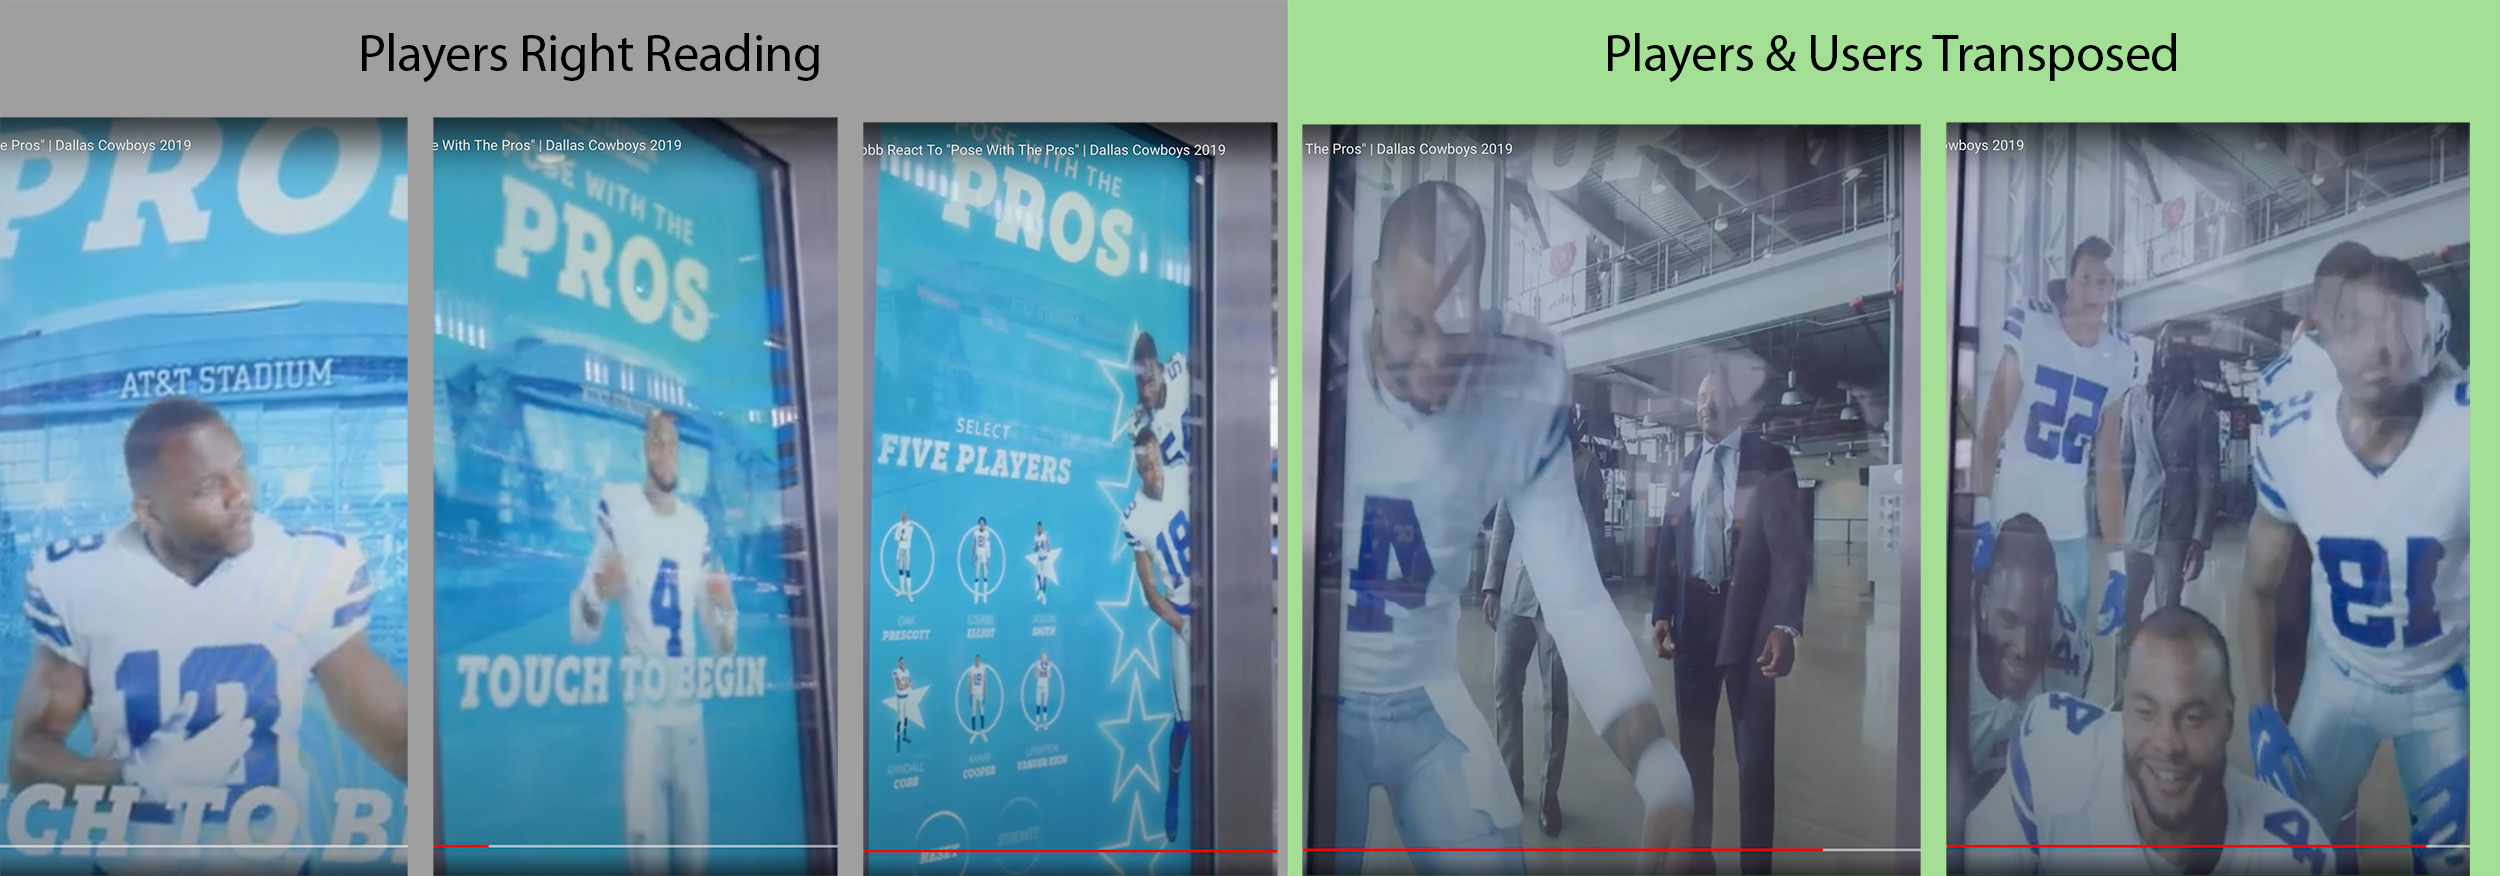
  • Select 5 players out of 6. Note if you don’t select 5, you can’t hit submit. In the end, you’re actually selecting one player who won’t be in the picture. This means you really only have 6 possible combinations.
  • Each time a player is selected, their associated video appears on the right side of the screen.
  • When you hit submit, the 5 selected players appear onscreen. You can see that the order in which the players appear is not the same as when you selected them. This leads us to assume there’s only one video edited in advance for each five player combination, meaning six pre-rendered videos.
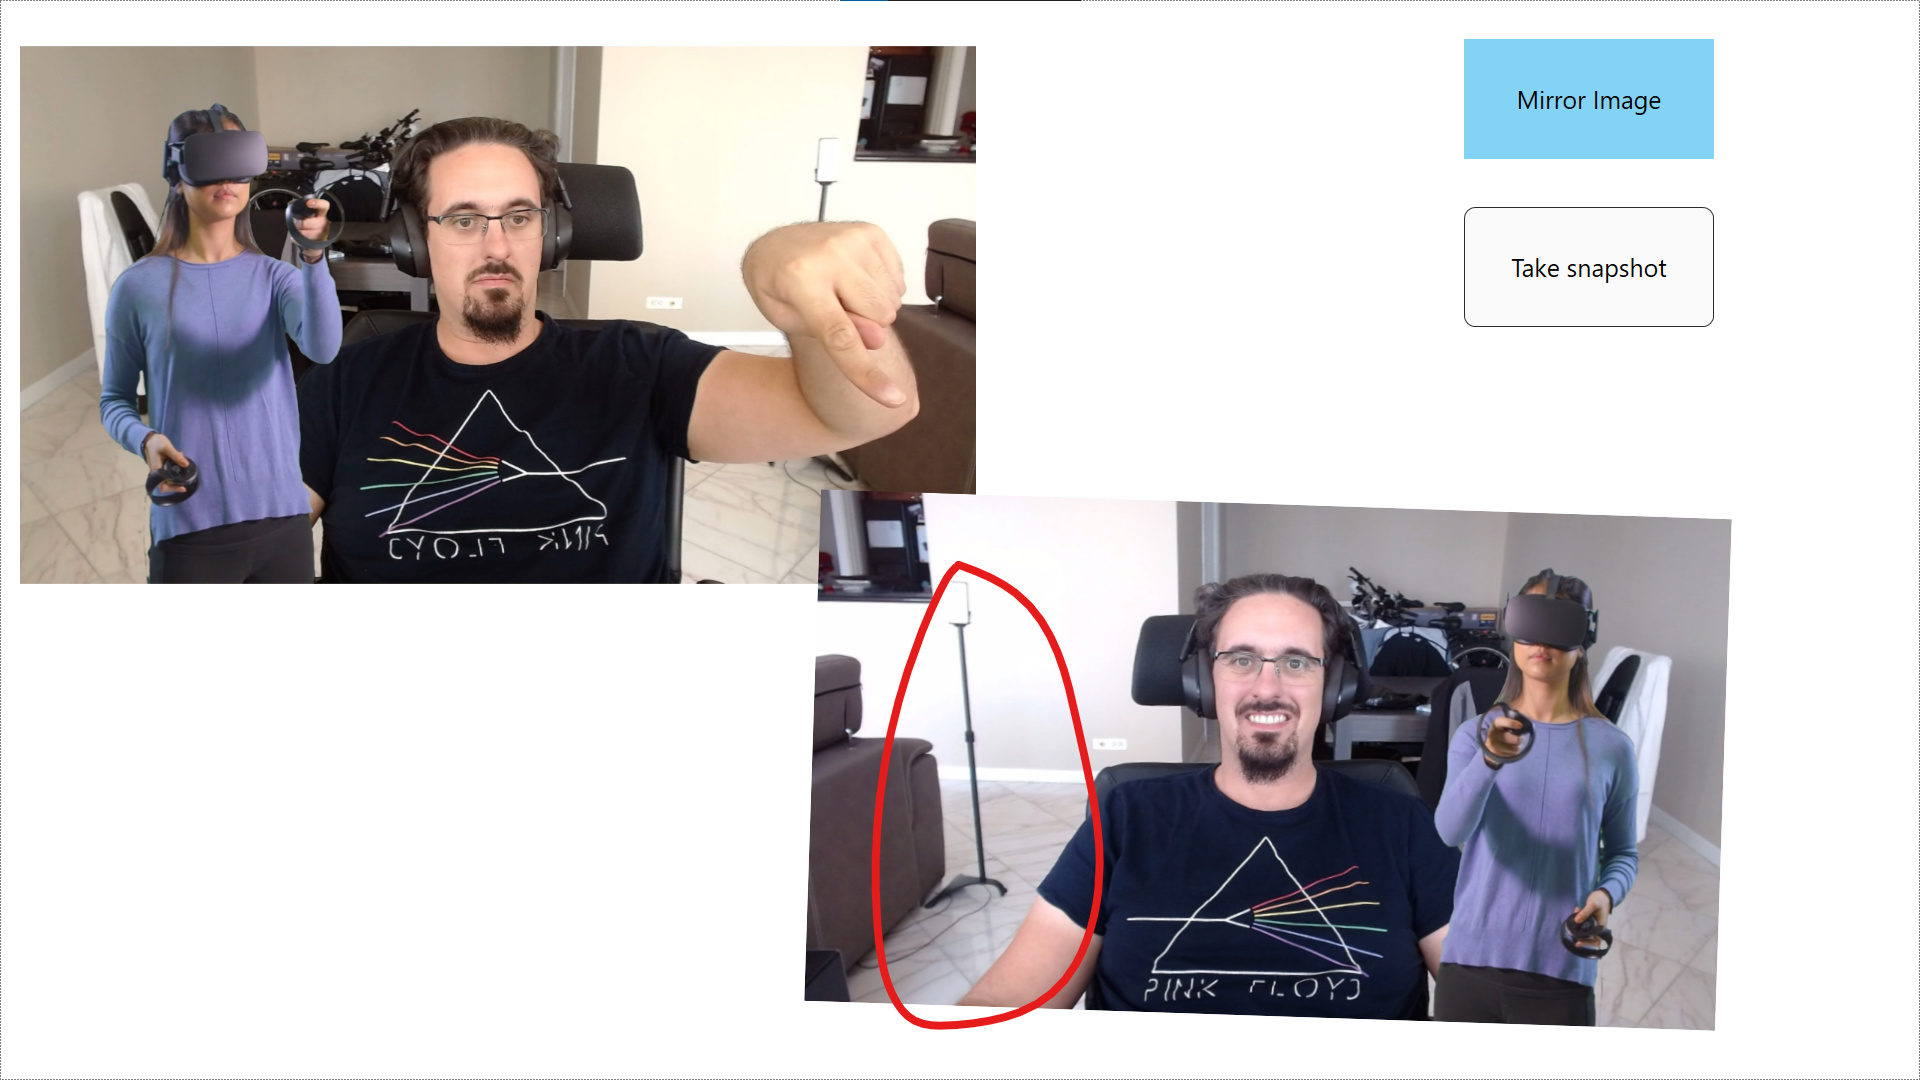
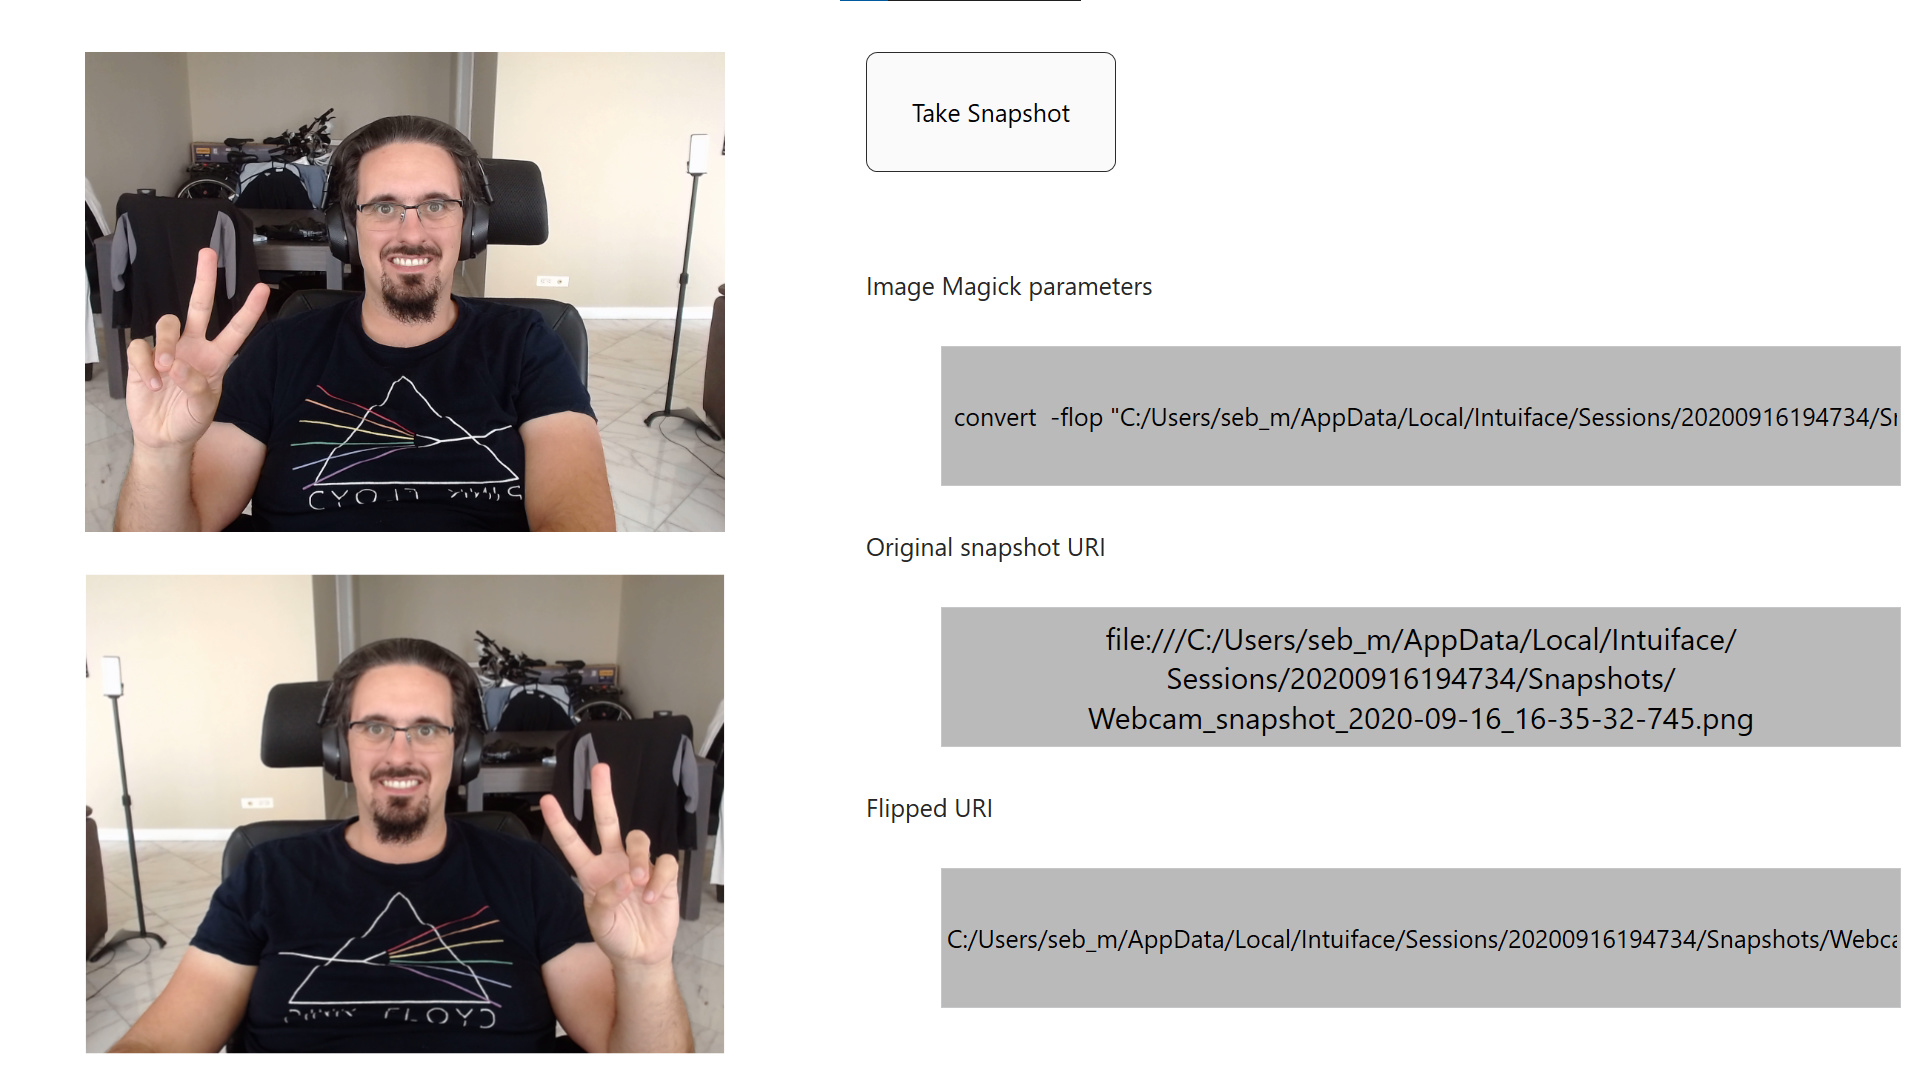
  • A webcam feed is then placed behind this pre-rendered video, followed by a countdown for the right pose, and then a snapshot is taken.

And yes, I am talking about videos, and especially videos using the well known green background to apply a chroma key effect. Special mention to @Promultis who has been asking, among others, for this feature a while ago.

So now let’s apply this concept to Intuiface, using some license-free footage found on the web.

2nd part: Reproduce the trick with Intuiface

Although Intuiface supports videos with a transparent background, they’re difficult to generate, use complex codecs, are large, etc…

The movie industry has been using green (or blue) screen for ever, so let’s assume the media producer would give us some regular MP4 videos with such a colored background.

We need to be able to play this video, while removing the “key color”, and to place it on top of the webcam feed.

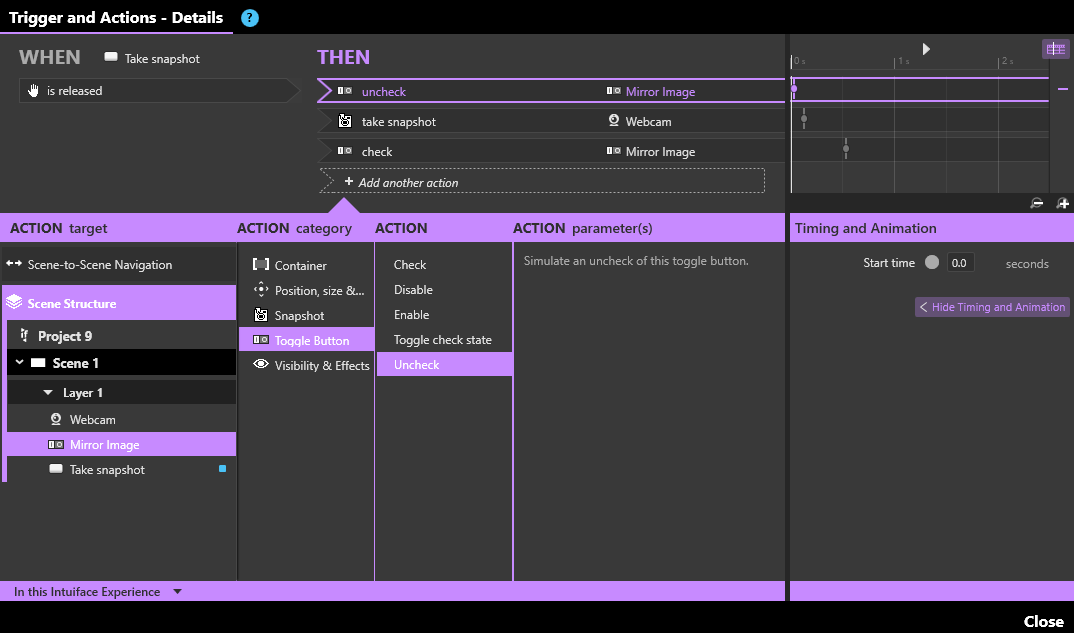
Since the Video Asset doesn’t have such a feature, we need to use a different asset. The Web Browser Asset will do the job as it enables us to use a local webpage relying on the p5.js and seriously.js JavaScript libraries. Without going too much into the details, these libraries will enable us to apply a chroma key effect on a local video file using shaders and the GPU => it’s good for performance!

This video was my main inspiration for building the web page:

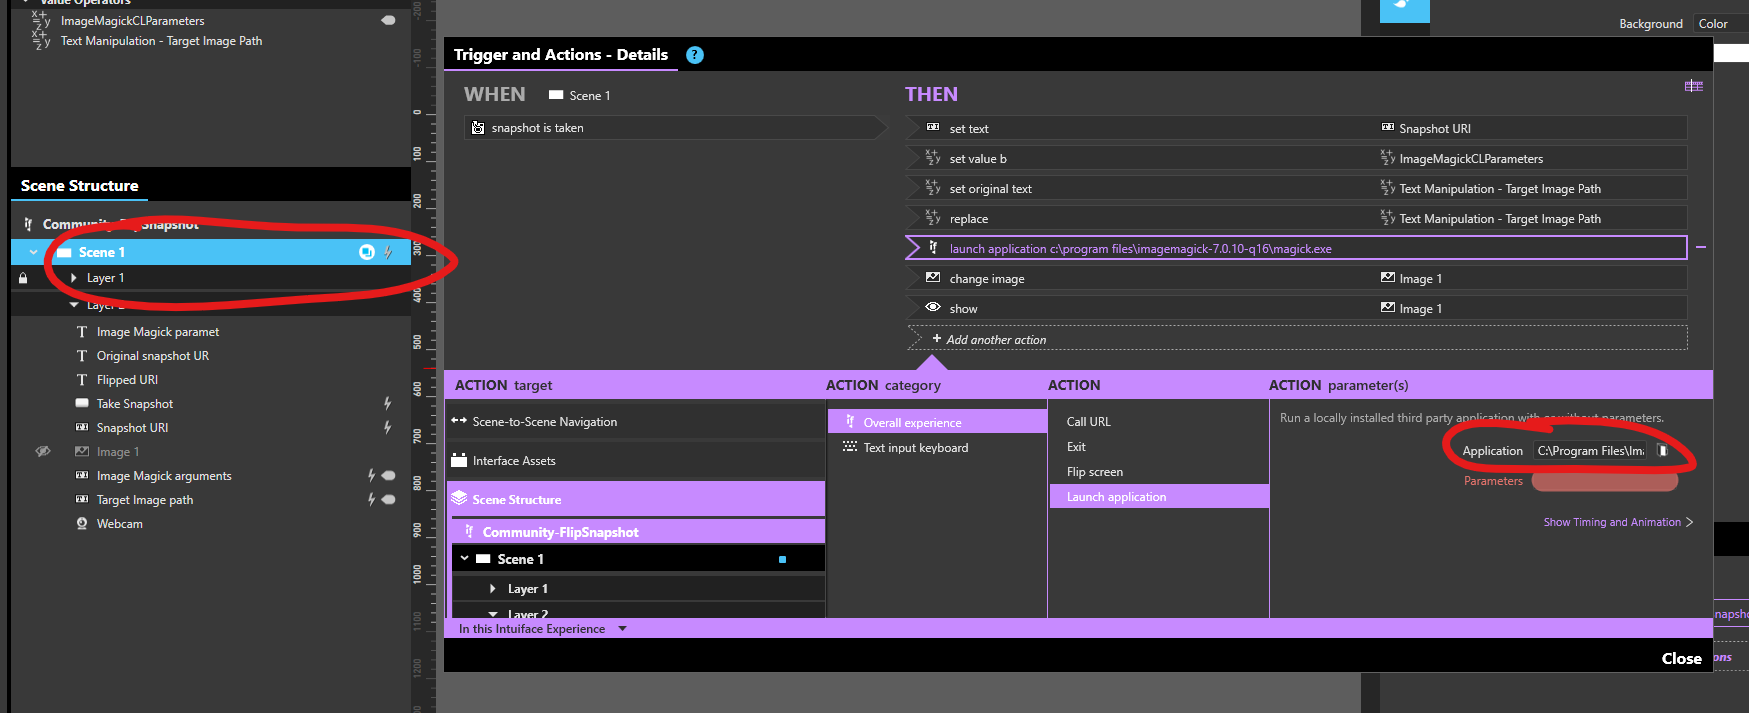
3rd part: Create it in Composer

  • Download the resources here. This package contains
    • the webpage source code
    • some sample license-free videos found on the web
    • a sample Intuiface experience.
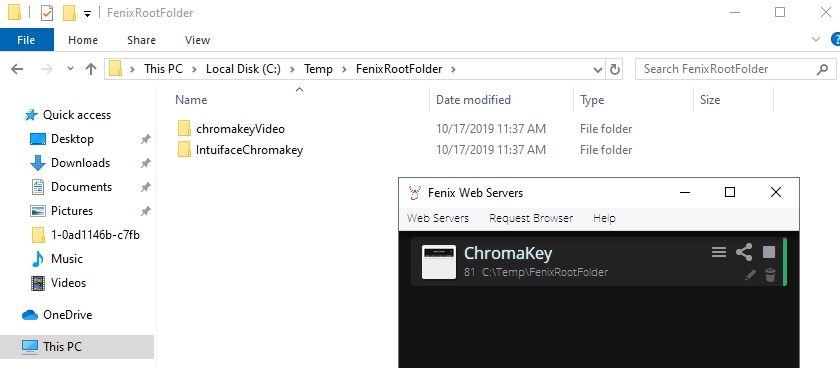
  • Install a local web server. I personally use Fenix Web Server as it’s super easy to setup.
    • Setup the new server on port 81 with a root folder of your choice. You can use a different port, but you’ll have to update the sample experience to fit your setup.
    • From the downloaded archive, move the IntuifaceChromakey and chromakeyVideo folders into this root folder.
    • Start your server. You can test it in a browser by going to http://localhost:81/IntuifaceChromakey/videoChroma.html
  • Open the sample experience in Composer and hit play!
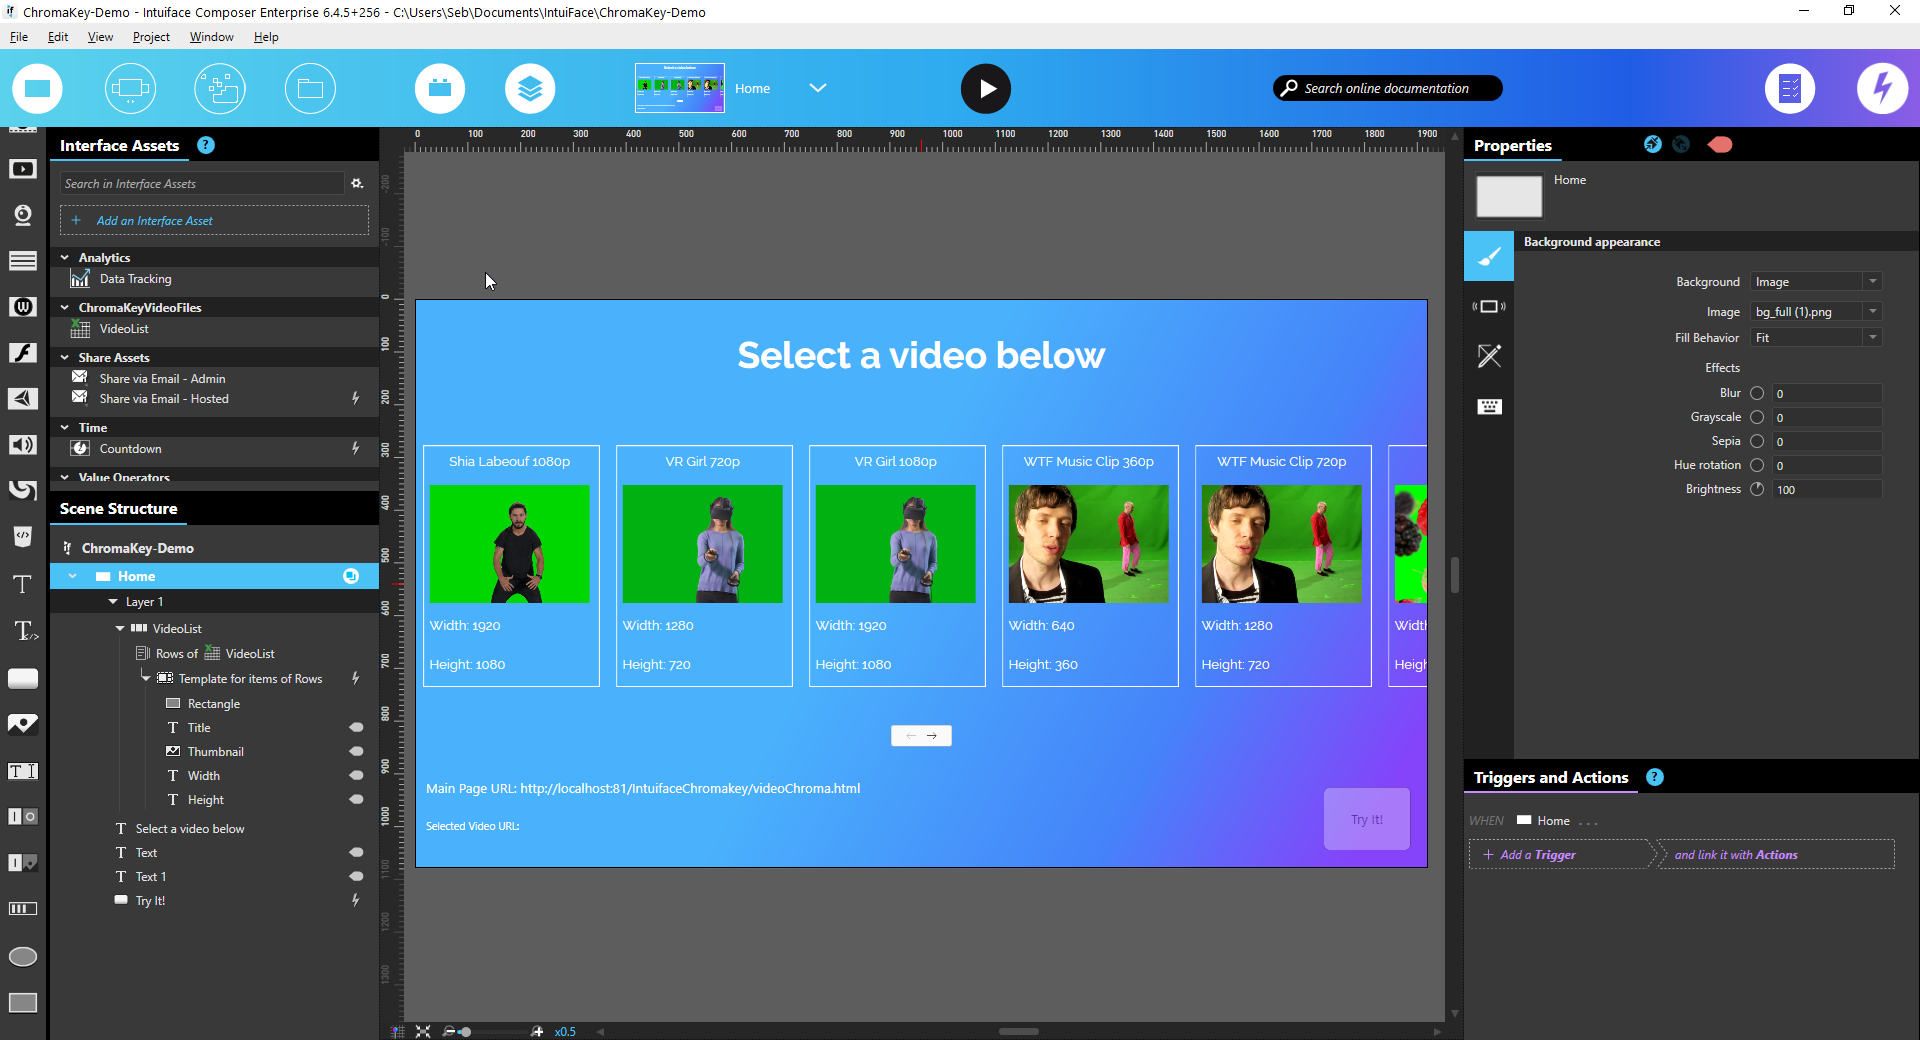
The result

The next steps

Now it is up to you, the Intuiface community, to take this sample and your creativity, maybe steal some ideas from our Photobooth sample and show us what you can do with this “new feature”. Enjoy!

15 Likes

@Seb My Man… Never fails to impress me!

Finally although not directly inside IF still an easier solution.!

4 Likes

EEEK!! I LOVE this! I’ve been wanting to do something with green screen since seeing a similar project here (watch at the 7:52 mark): [Hot&Young Seoul Trip I EP.1] Looking for the Seoul’s hidden gems The start of NCT’s youth journey! - YouTube

THE JOY IS REAL. :wink:

3 Likes

@megan my hometown!!:partying_face:

1 Like

@seb you are a real magician when it comes to push Intuiface to uncharted territories. Well done and thanks for sharing your R&D process in detail.

2 Likes

@bomee.lafitte I want to go someday! :partying_face:

Very very cool, congrats!! Dozens of clients asked me about this project. Nice to know we can do it in IF

2 Likes

You’re amazing, this is very cool stuff indeed. Will start playing.

1 Like

This is great @Seb. Thanks for putting this together. In the Cowboy’s experience the user selects 5 players and it plays back a video of each player, as they are each selected. Have you attempted or have you had any success using this method to process 5 videos using P5.js and Seriously.js and composite them in Intuiface?

1 Like

Hi @brian1,

I didn’t try this, mainly by lack of time and proper content. Video resolution and JS scripts should be optimized to process such a multiple video rendering smoothly.
If you do this test, please let us know how it goes

2 Likes

@Seb When we testing we opted to just have pre-baked files based on user selection. That said, we ran into another roadblock. The webcam displays an inverted image, like a mirror and of course this is what you expect from a camera. However, once the image is taken, there needs to be a way to invert it. If you notice, in the Dallas experience the image is inverted before displaying the final photo. This is really apparent when people are wearing shirts with print or numbers on them.

We thought we could achieve this by simply switching the dimensions of the photo to negative as this is how it’s accomplished in Photoshop, but Intuiface doesn’t seem to support this. Any thoughts on how we might reverse the image within Intuiface? This ended up being a dealbreaker for us unfortunately.

Hi @brian1,

There’s currently no built-in function in “invert” an image (= mirror horizontally).

One way that you could try would be to

  • take your snapshot and retrieve the image URI
  • pass this URI to a script, as described in this thread, that would invert it
  • retrieve the converted image and display it / enable to send it via email.
3 Likes

This is a really cool application, and we are looking to use this technology during Christmas at shopping malls throughout the U.S. As in Brian1’s case, the fact that the cam displays the user transposed as if looking in a mirror is going to be a dealbreaker for our customer. In addition to Seb’s idea of using a script, maybe at the Windows OS level the camera can be directed to flip horizontal, or maybe a third party video cam with its own software can be directed to do so.

Hi @shpeterson,
Did you try to just uncheck the “Mirror image” property of the webcam to see if would fit your needs?

1 Like

Thanks Seb. If I had only thought to look at the webcam settings I would have seen that by unchecking MIRROR IMAGE, that the snapshot taken does not have the user mirrored in the photo. The only thing that is a bit non-intuitive is that when the user positions himself/herself for the snapshot, they move in the opposite direction expected when looking into a mirror. Moving left is actually moving right and visa versa.

Thank you!

@shpeterson that’s a user scenario / content dilemma more than an Intuiface issue :wink:

Usually, we want to use a mirrored image in the live feed to make it look like a mirror. When the user moves his right hand, it’s the hand on the right side of the image that moves.
The question is about the added content (green screen video): is it mirrored or not?

  • If the green screen content is mirrored, meaning you couldn’t read properly the name on player jerseys, then you would need to
    • take the snapshot with both mirrored webcam + video
    • then mirror the snapshot, using the script method described above
  • if the green screen content is not mirrored, or if it doesn’t really matter (decorative animation), then you would need to
    • display a mirrored webcam image until the user “clicks” the take a snapshot button
    • quickly unmirror the image to take the snapshot
    • mirror the image back

That would give something like below

  • The top left is my live webcam + a green screen VR Girl
  • the bottom right is the “un-mirrored” taken snapshot. Note my T-shirt of the day is readable :wink:

Note: in this quick XP, I added the green screen video directly in the webcam feed in OBS, using OBS Virtual Cam as my Webcam asset source. This is why she is “un-mirrored” as well, going from the left to the right of the frame. If she had been added with the method described in this thread, she would have stayed on my left, somewhere in the red circle

To build the XP:

  • bind the “Mirror image” webcam property on a toggle button (you can hide it outside of the scene)
  • use the actions on the take snapshot button

1 Like

This makes sense Seb. I watched the Dallas Cowboys video again and studied it very carefully. They use a bit of trickery to achieve their end result. In the attached image, the first three sequences show the players “right reading” (jersey numbers display correctly). This is before the webcam is turned on.

Once the user makes his/her player selections, the players walk in transposed (jersey numbers “wrong reading”). The webcam is turned on and the user is also transposed (easier to position themselves as if looking in a mirror).

The snapshot is taken, and the script flips the image back to being right reading so jerseys and the user are displayed un-transposed.

This seems to make the most sense and if the position area for the users is narrowly defined, the shift from left to right will be minimal.

1 Like

I made a quick test using the Image Magick technique mentioned in [Shipped]Snapshot file size - Compression - #12 by Alex

Experience is available here: Community-FlipSnapshot.zip (8.3 MB)

After installing ImageMagick, make sure the right path is inserted in the Launch Application action

3 Likes

Very cool Seb! I will test it out. This will make the final flip easy before presenting to the user on the kiosk to either print or email.

By the way, love your T-Shirt. :wink:

Scott

2 Likes

Hi Seb,

I modified the XP from Community-FlipSnapshot.zip with the path to my installation of ImageMagick. The flipped image lands in the location shown the Flipped URI. However it does not display as Image1 below the webcam; I just get a spinning wheel.

Is there another location in the XP where I need to specify the path for the flipped image to display?

If you want to take a looked, you can find my published experience called: Community-FlipSnapshot -SP, which I shared with: xp-for-support@intuiface.com

Thanks,
Scott